Quilts 2011

28 November 2011

Quilt Ladder

Quilt Ladder by Life on the Selvage Edge
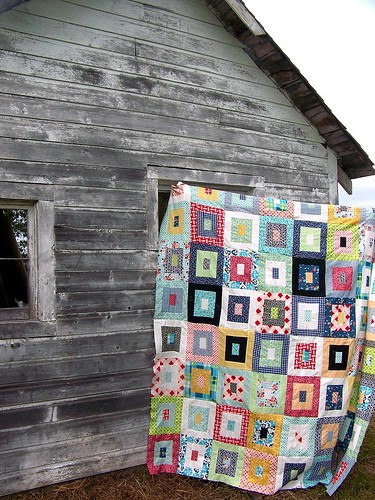
Quilt Ladder, a photo by Life on the Selvage Edge on Flickr.
While at the quilt retreat with friends, we got to talking about ways to display our quilts that still leaves them accessible for use... I want to snuggle in my quilts! And that wasn't your traditional quilt rack sort of deal.

On the long ride home all by my lonesome, I got to thinking about ladders. But not leaning up against the wall as we didn't have space in our house for something like that. How about hung sideways, up on the wall??? Hmmmm!

Before I started looking around at antique stores, estate sales, Craigslist, rummage sales, ect,  I called my dad the next day to see if there happened to be an old ladder laying around down at what used to be my grandparents farm.    He said "I don't think there's one down there, but actually I just walked outside my workshop and I happen to be holding one in my hands right now."

Wow, Dad. You're good.

Ends up it was the ladder from the loft bed in my dorm room, freshman year. It was a homemade set-up that I inherited from my cousin. And since 1997 it's been sitting outside, getting all weathered up. Just waiting! ;) And bonus, FREE and IN MY HANDS!

It took a little bit of elbow grease to get it cleaned up.  For some reason, laying in a yard for 10 years things get dirty.  Go figure.

Then became the dilemma on how to hang it. Something to support it, but something that can hold it off the wall so that the quilts could be looped over. Menards to the rescue! In their shelf stuff there were the perfect brackets - they angle off the wall.

Armed with them, some special screws so we didn't have to try to find studs underneath the plaster and lathe, and my willing husband, we got that sucker hung up!   Thank you, honey!

YAY! My quilts have a home!

Quilt Ladder

(And my dad said he was keeping close tabs on his 15 foot extension ladder. He knows the rate I've been quilting these days, that I'm going to run out of room awfully quick on the one we've got up there now!)

Linking up...

22 November 2011

Time for background audition for my quilt based on LRStitched's Mod Circles Quilt....  Excuse the less than desirable pictures.  They were taken at 3am when insomnia hit.  Much like the writing of this post!

 Light Grey

 Charcoal Linen

White

After taking the pictures, I left them on the kitchen counter and headed back to bed.  In the morning I asked my husband and son what they thought.  Husband said light grey or white.  Son said charcoal or light grey.  Since light grey got two votes, that's what I went with!

The process of putting it together involved cutting 10 inch squares of each:  front of each block, batting, and the backing.


On the front I traced around a leftover plate from our son's birthday party (my printer wasn't cooperating to print stuff out to the pattern's scale so I had to abandon the pattern's circle template).  I marked on the block the top and sides at the half way points and then eye-balled the marks on the plate to line up with the marks on the fabric square.  Not only did I draw the circle on, I also marked half-way points next the circle too.  I used a Clover White Marking Pen... can I say this thing is A-MAZING?!  It works on light and dark fabric.  It leaves a white mark that disappears with the heat of your iron or you can use water.  That pen was a popular requested "Can I borrow it?" item at the quilt retreat!


Then I placed the six "leaf" shapes around the circle, making sure leaf points met at the marks on two of the sides.

At this point I spray basted the batting to the front and I used my machine's blanket stitch to go around the outside of the leaves and then I did the inside.

After getting that part quilted, I spray basted the backing fabric on.  (I could have added the backing to start with but I didn't like how the button hole stitch looked on the back - personal preference.)

Then I quilted around the circle.  I moved my needle over as far as I could to the right (so it would be about a half inch from the edge of the pressure foot to the needle.)  Then I lined up the edge of the pressure foot with the outside edge of the leaf applique.  I made multiple circles to fill up the square.

At this point, I squared up my block.  Ended up making them 9.5" x 9.5" squares.

Some I did hand stitching on at this point, but then I decided I could do that at home, sitting in front of the tv.  I wanted to get more blocks put together!

To join the blocks, I followed this tutorial:  Quilt As You Go (This is Part 4, showing how I joined the blocks.)   I finally found it in my browser history... I was starting to think I had imagined the whole thing!

Here's the back of the quilt...


And here's a view of the front...


I'm getting there!  Only 2 more rows to go and then add the binding.  And do a bunch of hand stitching. Okay, I have quite a bit left to do now that I see it all written out... But the end is in sight!!

Linking up...
Fresh Poppy Design

17 November 2011

Quilt at the Farm

Fairy Tale

103_7325 by Life on the Selvage Edge
103_7325, a photo by Life on the Selvage Edge on Flickr.

Emma

Emma by Life on the Selvage Edge
Emma, a photo by Life on the Selvage Edge on Flickr.

Quilt Retreat 2011

After 2 years of being away (one due to a sick son, another one for a family trip to Disney World) I returned to my happy place last weekend... Quilt Retreat at Camp Lebanon with dear, dear friends.  So happy.  I knew I missed being in this beautiful space with an amazing group of women, but didn't realize quite how much!  And this camp gets hospitality.  They take such good care of everyone!  Friendly people, food to die for, comfortable accommodations.

A week before leaving I stopped at my most favorite local quilt shop, Hannah Johnson Fabrics.  Can I just say I LOVE this place?!  Amazing fabric.  And Janet, the owner, is so sweet.  It had been quite awhile since I had been in (needed to cut down on fabric consumption!) and she immediately mentioned how long it had been since she had seen me.  Awwww, thank you for noticing!  While there I saw the new Amy Butler line of fabric, Lark.


 Love it!  And she had charm packs.  Grabbed one of them, knowing this is what I wanted to use in my quilt retreat project.  No idea how, but it would be used.

Then I remembered this quilt I had pinned on Pinterest:


I love circles.  Polk dots.  Classic Mickey Mouse silhouette shape.  Perfect!  And that Lark fabric would look awfully nice.

Made a mock up of the circle to make sure everything would work out.  Good thing I did as my circle and applique pieces didn't print out to quite the right size so I had to look for another circle item in the house to use to trace.  Dug through the tupperware drawer, pulled out plates, nothing.  Until I found a leftover paper plate from our son's birthday.  Ding, Ding, Ding!  We have a winner!

The trial run block I turned into a case for my Nook:


Added some handstitching.  Made my first button too.  Fun!

It was a winner of a pattern.  Time to trace and cut out a bunch of the applique shape.  A couple of evenings in front of the TV, a church council meeting (I'm on staff at the church and sit in the back during the meetings... got to use each minute I've got! I usually doodle but at least this time I was productive), I got all 210 shapes traced and cut out!  Then at another super informal meeting I pulled all the paper off of from the Heat n Bond.  My friends thought I was peeling off band aids and were curious if I had some weird fetish.  :)

I also decided I wanted to make my quilt bigger than the pattern.  And that I would want to quilt it in circles.  But a big quilt and circles being quilted on my machine might be tricky.  And then I remembered a friend doing blocks in a quilt as you go style.  Google is my friend and I found a tutorial.  That I cannot find again.  I'll keep looking for it and post it once I find it.

Got all my background blocks and backing blocks cut out and ready to go.  It's quilt retreat time!!

Nook Case

Nook Case by Life on the Selvage Edge
Nook Case, a photo by Life on the Selvage Edge on Flickr.