Quilts 2011

27 December 2011

I love looking through Fat Quarter Shop's amazing selection of fabric.  And I'm always seeing what the "Blooger's Choice Bundles" contain - they're always awesome!

So it was announced this morning that Quokka Quilts teamed up with Fat Quarter Shop to have people design their own "Blogger's Choice Bundles" of 12 prints and 3 solids.  What an awesome idea!!  And the best part - one person will be picked  to win whole half yards of all 15 fabrics!  WOWZERS!

It was so much fun pouring through Fat Quarter's fabrics and try to narrow it down.  Super tough stuff!  I worked on a couple of different sets.  Here's one that I came up with:


I love greens.  I love aquas.  And I love polka dots.  Can you tell??

And exhale........

Christmas 2011 is in the books.  I sewed until my eyes were crossed, spent wonderful time with the family, didn't get much for decorations up other than the tree, traveled a bit, spent a whole day in my pajamas, got some naps in, and ate way too much sugar.  Successful Christmas!

One of the best parts - having our brand new niece around for her first Christmas!  Here's the cutie patootie with our son after his church Christmas program.  She's only 3 1/2 months old, but they've already got a connection!  


So I sewed a butt load of stuff for this Christmas - 2 t-shirt quilts, a table runner, 2 zippered pouches, a toaster cozy, a minky/flannel blanket, a bib, and an ipod case.  And the only thing I have a picture of at this point is the ipod case (well, the one t-shirt quilt I already posted.)  The rest of the pictures are on my camera.  And the batteries got robbed from my camera to go in our son's Air Hog helicopter present after we neglected to buy batteries for it.  (And can I say that that Air Hog is the most annoying sound in the world?!  It's like a beeping blender flying around our house, crashing into everything. No damage was done to house or people, other than a splitting headache that resulted.  And I'll admit I was a tad happy the helicopter got into some of my fiberfill stuffing and wrapped around the rotor, causing it to stop spinning.  I rescued it, but hid it soon after.)  

Anyhow, once I get more batteries I'll post pictures of all the stuff.  In the meantime, here's the ipod case I made up for the kiddos.  It seems "Ben 10"ish to me.   Which works for our Ben 10 loving kiddo.  


It's got that super hard (and super expensive) double sided fusible interfacing.  I have a bunch leftover after making a diaper bag for the cute baby up above.  The pattern told you to buy 3 yards(and it was like $10/yard!  Thank goodness Hancock lets you use the 40% off fabric coupon on the interfacing).  I was so ticked when I used just over 1 1/2 yards.  So now I have lots of it left over.

When the LQS down the street from our house went out of business, I grabbed a package of grommets.  This was the first time I had ever used them before - it was fun working with them!  For this project they serve no purpose other than to look cool.  And according to the Kiddo, they pass as cool.


The inside is flannel, outside a grey Kona.  And I got to try out a decorative stitch that I've never used before.  

So there's one of the many projects from December.  More to come! (Once I make it to the store for more batteries...)

Linking up...


05 December 2011

T-shirt Quilt

I have successfully finished my first t-shirt quilt! Well, almost done. Just the binding that's left, but I was too excited/exhausted to quite finish it tonight.

Not only is this my first t-shirt quilt, it's also the first time I've been commissioned to make a quilt. A friend wanted to put her husband's shirts into a quilt and give it to him for Christmas. He officiates at bike races and this is an assortment of shirts from the races.

I wasn't too sure about the Michael Miller Citron Gray Bicycles. The color is, um, interesting. It's kind of bright in a dull way. Does that make any sense?! When she gave me the shirts I immediately thought of this fabric, but in a different color way. However my LQS was out of the other color and this is what they had left. So I bought it. And then let the whole project sit for a L-O-N-G time because I was so unsure of the fabric, but wasn't sure what else to use.

But with Christmas right around the corner and a ton of my own projects to do, I had to dive in today and get the thing done so I wouldn't have it hanging over my head any more!

Those citron bikes grew on me. I think it works with the t-shirts. And it was my husband's idea to put the outside grey border on the whole thing. Great idea, honey! Ties it all together (and I had the perfect amount left of that fabric to do the border... I found the piece and it was like it was meant to be. There's only a tiny little piece left!)

Now to do the binding in the morning so I can get it to my friend. Then time to move on to The List. The List being all the Christmas projects to get done.

The List at this point includes:
Something for our son (things he needs are a case for his Bible and a case for his iTouch. I've also got a hunk of Green Packer fleece for a blanket. I thought it would be the backing for a t-shirt quilt, but I don't know if there's time to make another quilt. )

A gift for my mom - she mentioned tonight she'd like a cover for her new toaster oven. Sounds like something I should make!

A couple of zippered pouches for family and friends

That's what I can think of now. There's probably more but I may freak out if I list it all out!

Oh, and there's that whole housework/laundry/day-to-day life stuff that I'm so behind on.

And decorate the house for Christmas.

Oh, goodness.

28 November 2011

Quilt Ladder

Quilt Ladder by Life on the Selvage Edge
Quilt Ladder, a photo by Life on the Selvage Edge on Flickr.
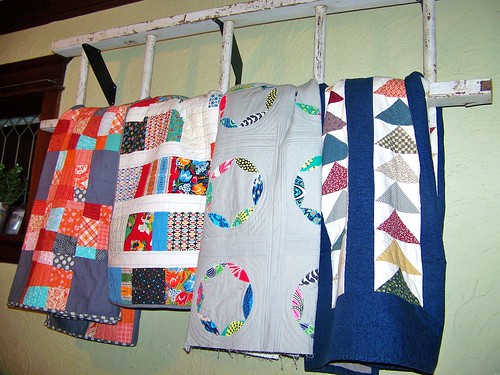
While at the quilt retreat with friends, we got to talking about ways to display our quilts that still leaves them accessible for use... I want to snuggle in my quilts! And that wasn't your traditional quilt rack sort of deal.

On the long ride home all by my lonesome, I got to thinking about ladders. But not leaning up against the wall as we didn't have space in our house for something like that. How about hung sideways, up on the wall??? Hmmmm!

Before I started looking around at antique stores, estate sales, Craigslist, rummage sales, ect,  I called my dad the next day to see if there happened to be an old ladder laying around down at what used to be my grandparents farm.    He said "I don't think there's one down there, but actually I just walked outside my workshop and I happen to be holding one in my hands right now."

Wow, Dad. You're good.

Ends up it was the ladder from the loft bed in my dorm room, freshman year. It was a homemade set-up that I inherited from my cousin. And since 1997 it's been sitting outside, getting all weathered up. Just waiting! ;) And bonus, FREE and IN MY HANDS!

It took a little bit of elbow grease to get it cleaned up.  For some reason, laying in a yard for 10 years things get dirty.  Go figure.

Then became the dilemma on how to hang it. Something to support it, but something that can hold it off the wall so that the quilts could be looped over. Menards to the rescue! In their shelf stuff there were the perfect brackets - they angle off the wall.

Armed with them, some special screws so we didn't have to try to find studs underneath the plaster and lathe, and my willing husband, we got that sucker hung up!   Thank you, honey!

YAY! My quilts have a home!

Quilt Ladder

(And my dad said he was keeping close tabs on his 15 foot extension ladder. He knows the rate I've been quilting these days, that I'm going to run out of room awfully quick on the one we've got up there now!)

Linking up...

22 November 2011

Time for background audition for my quilt based on LRStitched's Mod Circles Quilt....  Excuse the less than desirable pictures.  They were taken at 3am when insomnia hit.  Much like the writing of this post!

 Light Grey

 Charcoal Linen

White

After taking the pictures, I left them on the kitchen counter and headed back to bed.  In the morning I asked my husband and son what they thought.  Husband said light grey or white.  Son said charcoal or light grey.  Since light grey got two votes, that's what I went with!

The process of putting it together involved cutting 10 inch squares of each:  front of each block, batting, and the backing.


On the front I traced around a leftover plate from our son's birthday party (my printer wasn't cooperating to print stuff out to the pattern's scale so I had to abandon the pattern's circle template).  I marked on the block the top and sides at the half way points and then eye-balled the marks on the plate to line up with the marks on the fabric square.  Not only did I draw the circle on, I also marked half-way points next the circle too.  I used a Clover White Marking Pen... can I say this thing is A-MAZING?!  It works on light and dark fabric.  It leaves a white mark that disappears with the heat of your iron or you can use water.  That pen was a popular requested "Can I borrow it?" item at the quilt retreat!


Then I placed the six "leaf" shapes around the circle, making sure leaf points met at the marks on two of the sides.

At this point I spray basted the batting to the front and I used my machine's blanket stitch to go around the outside of the leaves and then I did the inside.

After getting that part quilted, I spray basted the backing fabric on.  (I could have added the backing to start with but I didn't like how the button hole stitch looked on the back - personal preference.)

Then I quilted around the circle.  I moved my needle over as far as I could to the right (so it would be about a half inch from the edge of the pressure foot to the needle.)  Then I lined up the edge of the pressure foot with the outside edge of the leaf applique.  I made multiple circles to fill up the square.

At this point, I squared up my block.  Ended up making them 9.5" x 9.5" squares.

Some I did hand stitching on at this point, but then I decided I could do that at home, sitting in front of the tv.  I wanted to get more blocks put together!

To join the blocks, I followed this tutorial:  Quilt As You Go (This is Part 4, showing how I joined the blocks.)   I finally found it in my browser history... I was starting to think I had imagined the whole thing!

Here's the back of the quilt...


And here's a view of the front...


I'm getting there!  Only 2 more rows to go and then add the binding.  And do a bunch of hand stitching. Okay, I have quite a bit left to do now that I see it all written out... But the end is in sight!!

Linking up...
Fresh Poppy Design